Showing posts with label R32. Show all posts

Saturday, 15 October 2016

Mokit: Skyline R32 Part 12

My stash, Tamiya R32, Tamiya R89C, Tamiya Miata
Hi,

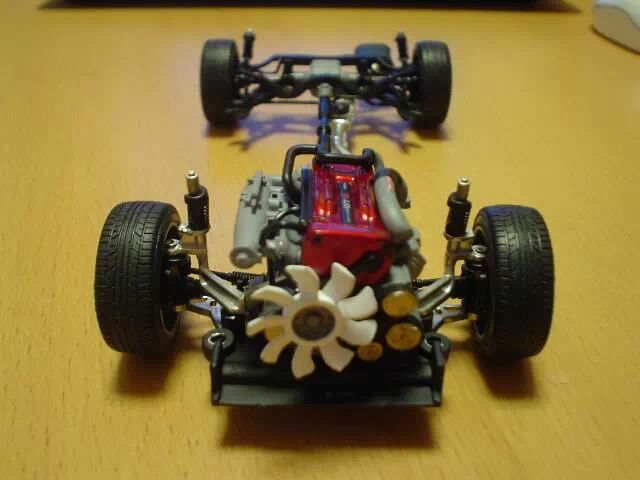
Welcome to the last post of Nissan Skyline R32 built off. This post took me near 3 years to post up to here if im not mistaken. The R32 was brought to my first TT (Teh Tarik) of BBSTC at Johor Region. That TT was rather a small group of mokit maker of Malaysia southern region, Johor Bahru. The TT was held at Fita Hobby Shop JB. Today, Fita's were no longer operational due to some problem. Its, quite rough to own a Hobby shop in JB moreover, Malaysia. Hobby scene in Malaysia is still not as vast and broad like Japan, America or United Kingdom. 


Monday, 20 June 2016

Mokit: Skyline R32 Part 11

The perfect interior of R32

HI,

Welcome to Part 11 of the Skyline R32 built. 
This time we will focusing on the built of the Interior of the kit. 
Mainly were are building the roof of the kit.

Monday, 22 February 2016

Mokit: Skyline R32 Part 10


HI,
Welcome to Part 10 of the R32 Skyline built post.
As you can see above, I get the Tamiya R32 Skyline GTR kit.
 This kit come with engine RB26DeTT. 
There are turbo's included and its so cute. 
The detail of this kit is so mesmerizing and for R32 enthusiast I think one should get this pronto.

Sunday, 21 February 2016

Mokit: Skyline R32 Part 9

HI,
Welcome to part 9 R32 Sklyine built.
Its been a while since my last post, im now constantly post my daily mokit progress at the Facebook page Mokitforever. You can subscribe to it before you can view this blog. If you reading this I hope you already LIKE that pages. 
I will keep updating this blog from time to time with what post I feel to share. 
There are so many to share.

Let's get going and see this part 9 Skyline.

R32 Tamiya kit

Wednesday, 16 December 2015

Mokit: Skyline R32 Part 8


Hi,

Its been awhile since I last update this blog. 
Several time i came here but i got no time to write until today.
Now we are at Part 8 of our R32 built. 
Its have been a great journey so far.

Thursday, 10 September 2015

Mokit: Skyline R32 Part 7


Hi,

Welcome to the Part 7 of the Nissan Skyline R32 built.
Previously, we had done the engine bay and the interior. This time we are doing the clear part of the kit and start to spray the bodyshell.

Tuesday, 7 July 2015

Mokit: Skyline R32 Part 6

Dashboard how woman see it. 
Hi, 

This is part 6 of my Skyline R32 built. This part is focusing on the detailing the interior and making detail of the interior. The interior play a important role as the main attraction and a place where you can put some characteristic of the car is in this areas. The exposure of this area is limited when you had complete the kit. Its really hard for spectator to see inside the car, and that made thing more exciting. Spectator will be amazed when they found and see something that they can related to the kit and show some identity of the kit from others. This will give them the sense of connection and will put the image of the kit in their heart. 

Advanced modeler will put drinking can such as Coca cola or Pepsi and intentionally put inside the cockpit to indicate that the drive of the kit like to drink Coca cola. Some put small printed magazine or newspaper of interesting topics. Owh, not to forget some also put AV girl magazine and a tissue box with used tissue all over the places. This is your area to put some identity or a story to tell to the spectator, so let be crazy at this areas!

Sunday, 5 July 2015

Mokit: Skyline R32 Part 5

1:1 scale Skyline R32 GTR
Hi,


Welcome to Part 5 of Aoshime Nissan Skyline GTR R32.

This part we will see interior built up and a bit of openable hood hinges trial.

The green color thing is the wire insulated for hinges built up. I used paper clip as a material to substitute metal rod. The green thing supposed to be the insert joint of the metal and going to be glued to the body of the kits.

Close up angle of all the material involved. Before this were inserted I has cut the firewall engine in straight line for the metal to be inserted as the back. This will hide the metal thus making its more realistic.

Do to the others half.

Please take note for the green things. That the correct positions to be place the green things.

Other angle of the green this to be operated.

Sprayed this seat flat black. Masking tape were put to maintain the correct color of the seat with flat black and grey. 
Skyline R32 in the making.

Mock up steel wiring inside the engine bay to imitate the real brake line.

I just do this at my heart content and with a bit of picture for reference. The bracket that hold the wire in place is made out of eraser. I carve it as glue it to the firewall.

Engine wiring detailing close up.

Put some color at the parts. Yellow on the brake fluid pump cap, yellow on the distributor, red on the air filter box, and silver on the engine pulley.

Another angle for clear view.

Start merging the dashboard to the chassis. Please noted that the chassis has been cover with felt to represent carpet inside the car. The felt were glued with 3 second glue and the felt has been cut according to the floor panel.

Felt cover up almost all the floor panel.

Mock up the chassis with the upper body. This angle to view the dashboard. See the felt lay flat on the floor panel just like carpet.

Engine mock up with the upper body, car seat complete painted. 

Engine mock up. See how thing start to pop up from that tiny tiny detail.
Complete part 5.
This part show how to detail up the engine bay with wire and play with some color. I didn't apply any old and used effect on the engine bay since this is my first kit. I honestly didn't want to ruin my kit from my mistake doing aging. 
Well, that Part 5. Keep mokit bruh!!

KKuet.al


Tuesday, 10 March 2015

Mokit: Skyline R32 Part 4

Brake and brake pump complete painted.

Welcome to the Fourth episode of this Aoshima Skyline R32 kit build up.


Wednesday, 28 January 2015

Mokit: Skyline R32 Part 3

TAMIYA R32, This in my stash now!
Hi.

Meet again in this part 3 of my Nissan Skyline R32 build up.

On the last post we stop at wetsanding the godzilla. Wetsanding is the term used for sanding on any surface with the help of water. Water help to smoothen the sanding and give a silky and nice surface. Do not apply too much pressure when wetsanding as it will easily torn up your kit.

Friday, 27 June 2014

Nubis: Skyline R32 Part 2

Parts that need attentions.
Hi,

After I done prime all the parts needed. I then start to spray all the important part with DPI Anchor Silver color for basecoat. Silver is said to be capable of giving shiny and reflecting effect to the color above it. 

Wednesday, 5 February 2014

NUBIS: GET YOU FIRST KITS

My first mokit from Aoshima complete with engine detail.
Hi guys, 

It's been long time since my last post. The year flew by the holiday come and gone, people getting older and my WIP still..well in progress.

Introduction

Today you will get to know my first model kit and why I choose to buy it at the first places. I didn't have any knowledge in modelling but I do love modified things. I happen to played with Hotwheel sometime ago and did a few modification on it. Its a Mercedes SLR cabriolet and the color is yellow. I didn't remember how I got it but I just there.